Disclaimer: Any products/services mentioned or recommended below are suggestions based on our own experiences. We have no affiliation with any of the products or services mentioned and you should always thoroughly and independently research your options to decide what is best for you.
Having your WordPress website optimised for search engines professionally can be a very expensive endeavour, both upfront and ongoing. Unfortunately, SEO can be a never-ending battle as the moment you stop paying for it to be managed or stop working on it yourself, a competitor may take over and render all of your previous investment and/or hard work obsolete.
Not all small businesses have the budget to pay for professionals to manage their SEO. Often coming with a price tag in the thousands of dollars per month, it can be a hefty expense for even well-established businesses, let alone start-ups.
Because of this, you may decide that you wish to give it a go yourself. To get you started on the right path, we’ve created the following guide to help you track a portion of your SEO work from a centralised spreadsheet, ensuring you can easily overview your work and make any adjustments needed as you see fit!
The below guide is best suited to intermediate to advanced users and assumes you have a solid understanding of the basis, such as installing plugins. If you are a WordPress beginner, we suggest consulting with a WordPress developer if you get stuck. This guide works just fine for both new and well-established WordPress websites, however, we do recommend you take a full backup before attempting the steps below in case you need to revert back.
The Goal
This guide will show you how to create a centralised, online spreadsheet that syncs with your website automatically. On this spreadsheet, you will be able to see such data as the title, slug, permalink, meta title, meta description and content rating for every page and post on your website. Having these details correct and accurately filled in can have a huge impact on how well the posts and pages on your website will rank on Google. Being able to edit them all from one spreadsheet will allow you to easily overview any missing or incorrect values, as well as save you from having to open every post and page one by one to edit these details.
The Tools
You’re going to need a few tools of the trade to get this working:
- A Google account. You will use this account to host an online Google sheet (spreadsheet), which will sync data to your website.
- The WP All Import & WP All Export plugins. You will use this plugin to map the fields between your WordPress website and your spreadsheet. We would recommend the “Import & Export” bundle for this purpose.
- The Yoast SEO plugin for WordPress. Other popular SEO plugins for WordPress will also work, though you will need to work out their mapping fields yourself. For this guide, we’re only going to cover how to do this with Yoast as it is one of the most popular options in use at this time.
- The Import Settings into WordPress SEO by Yoast plugin.
The Steps
Note: The steps below cover existing posts and pages only. You may also want to do other custom post types, or products etc. If this is the case, simply repeat the steps the same way but for your desired extra post types. Once your posts and pages have been created on your website, follow on below:
- First of all, ensure you have WP All Import, WP All Export, Yoast SEO & Import Settings into WordPress SEO by Yoast plugins installed and activated on your WordPress website.
- Next, create a brand new temporary page and call it something you will remember such as “Temporary SEO Page”. On this page, choose something other than the default for every single Yoast SEO option and then save it. This ensure the fields are created in your database and will show up as options to include in your spreadsheet. Repeat this process for a brand new post as well.
- Next, navigate to WP All Export in your WordPress dashboard and select “New Export”. When you’re asked for a post type, let’s start with “Pages”. Then click “Customize Export File”. At the next screen, click the “Clear All” button to remove the fields that were automatically added. We now want to go through and add back only the relevant ones for our purposes. Use the “Available Data” panel to the right to find the following fields, then drag them across into the centre panel:
- From the Standard category:
- ID
- Title
- From the “Custom Fields” category. (If you can’t find any of the below, it means you must have missed filling in a Yoast setting somewhere on your temporary page. Go back to your temporary page and ensure all settings are filled in. You may also find that the Yoast fields are scattered in no particular order throughout a large amount of other field options in the list so they can be a little hard to spot sometimes.)
- _yoast_wpseo_title
- _yoast_wpseo_metadesc
- _yoast_wpseo_focuskw
- _yoast_wpseo_opengraph-title
- _yoast_wpseo_opengraph-description
- _yoast_wpseo_meta-robots-noindex
- _yoast_wpseo_meta-robots-nofollow
- _yoast_wpseo_canonical
- From the Standard category:
- Re-order your fields to match the order they are listed in above if they don’t already.
- Once you’ve found all of the above fields, click “Continue”. At the next screen, in the “Friendly Name” field, type in a name such as “Pages SEO Export” and then click “Confirm & Run Export”. Once the export is complete, click the “CSV” download option.
- Repeat everything in step 2, except at the beginning after choosing “New Export”, choose a post type of “Posts” instead of pages. Likewise, when giving the export a friendly name, call it “Posts SEO Export”. Everything else remains the same for both exports. Once you have your 2 exports downloaded, one for posts and one for pages, please continue to the next step.
- It is now safe to go back and delete the two temporary posts/pages you created at step 2. They have finished serving their purpose of generating all the Yoast fields for your exports.
- Next, upload your two export CSV files to Google Drive through your Google account.
- Open your spreadsheets one at a time and review the data within. For most of the fields, the data that should be within each field is simply going to be text of your choice. A couple of fields however are set options which you must enter a specific text string for to match with Yoast’s predetermined options. Those fields are as follows:
- _yoast_wpseo_meta-robots-noindex
- empty = site default
- 2 = yes
- 1 = no
- _yoast_wpseo_meta-robots-nofollow
- 2 = yes
- 1 = no
- _yoast_wpseo_meta-robots-noindex
- You now have your spreadsheets ready to go. Next, you need to create the import which will sync those spreadsheets back to your website. This will then allow you to edit all of your Yoast data for all pages and all posts from 2 easy spreadsheets, rather than opening each post or page one by one to edit them.
- With your “Pages” Google sheet open, click File > Publish to the web…, then click the “Web Page” drop down and select “Comma-separated values (.csv)” instead. Then click publish. Copy the link you are given to your document.
- Head back to your WordPress dashboard and head on over to WP All Import > New Import. From the options, select “Download from URL” and paste in your link from step 11, then press “Download”. For the “Import data from this file into…” option, choose “Existing Items”. For the drop down below that, choose “Pages”. On the next page, simply click “Continue to Step 3”.
- Now you have the job of finding and matching 7 of your 8 fields up to the right spots in your import template. First, drag the “title” field name from the right-hand panel into the “Title” field on your template. Next, head to the “Yoast WordPress SEO Add-On” section and match the 6 Yoast-related fields.
- Don’t try to find/match ID at this point – that will come on the next step. Once you have matched up everything except ID, click “Continue to Step 4”.
- On this page, you will now set up the field that will match the spreadsheet content to your existing pages. Under the option “Records in your file will be matched with Pages on your site based on…”, choose “Post ID” and drag in your ID field.
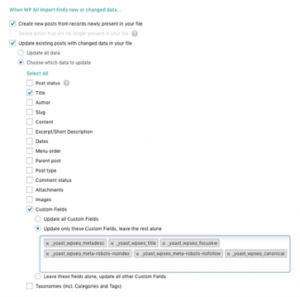
- Next, go down to the “Update existing posts with changed data in your file” option and ensure it is checked. Below it, select “Choose which data to update”. Then, ensure all items are unchecked except for Title and Custom Fields (which should be set to “Update only these Custom Fields, leave the rest alone”. In this field, copy and paste in your 6 Yoast field names. It should end up looking like this:

- Go down to the “Configure Advanced Settings” section and down the very bottom, give it a friendly name. To make them match your export names, we’d recommend calling it “Pages SEO Import”.
- Finally, you’re ready to sync your file. Press “Continue”, then “Confirm & Run Import”.
- Once complete, go back and repeat all of the steps from step 11 onwards, this time for “Posts” instead of “Pages”.
- Now whenever you wish to make changes to this data, simply make your changes in your spreadsheets, then go back to WP All Import > Manage Imports and run your two imports. If you’re savvy with cron jobs, you can also set up a cron to do that automatically for you on a regular schedule.
Whenever you create new posts or pages that you want to manage, simply run your exports again and copy/paste your new spreadsheet data into the existing spreadsheet that you have already published to the web. This will allow you to keep managing all of your SEO content from your spreadsheets.
That’s it from us for this week. As always, if you have any questions about this post or our shared hosting, VPS, Reseller or dedicated server plans, simply call us on 1300 MY HOST (694 678) during business hours, or submit a ticket through our Support Portal and one of the crew will be in touch!