Disclaimer: Any products/services mentioned or recommended below are suggestions based on our own experiences. We have no affiliation with any of the products or services mentioned and you should always thoroughly and independently research your options to decide what is best for you.
Even More Important Disclaimer: We cannot stress enough the importance of taking a full backup before making any changes to your site.
Tip #2 of this series is available here: How To Make Your WordPress Website Load Faster (Tip #2: Database, Comment and Revision Management)
Purgatory, according to theology, may be defined as the intermediate state after physical death in which you must wait, as punishment for your sins, before you can enter heaven.
Sounds a bit… familiar.
Today, website owners, we bring you the first part of our new series which focusses on improving your WordPress website’s loading speed. Keep your eye out for our tips over the next couple of weeks to ensure your website loads lightning-fast, and veers as far away as possible from becoming a purgatory simulator. The best part? You can perform each tip in under 10 minutes. Maybe. If you’ve had at least 7 coffees. Either way, it’s pretty damn quick.
Let’s start with introducing our judges for today’s tip, and all of the tips that follow. Before you begin any of the steps below, please open up the following two websites:
Next, type in your domain into both of these websites and run the tests. Once they’re finished, you’ll be shown some facts and figures about how long your website took to load. We’d recommend that you take a screenshot so that you may compare the before and after effects of today’s tip and any future tips that you may follow.

Images that are either far too large in dimensions or quality are the number one, most-common reason a website’s speed may drop off into the depths of hell.
Don’t panic – the thought of opening up a bunch of images and resizing them one by one triggers us into a state of numb terror as much as anyone, but luckily, this is a task that can be done quickly and automatically with a plugin – for both your existing images, and any images you upload in future.
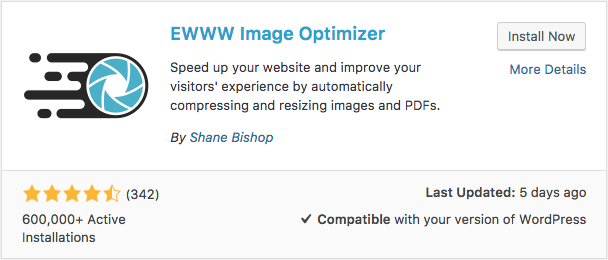
There is a myriad of image optimisation plugins on the market to choose from. On the basis of simplicity, affordability, large user base (600,000+) and responsive support, we’ve gone with EWWW Image Optimizer, but if you’d prefer, you can always try out any of the other options.
Step 1: Prepare Your Hosting Account
The first step is very quick! Simply open up your cPanel, then find and click on the “Optimize Website” icon.
Then, select “Compress All Content” and finally “Update Settings”.
Step 2: Install the Plugin
Open your WordPress dashboard and hover over “Plugins” on your-left-hand menu, then click “Add New”.
In the search box, type in “EWWW”. The first search result should be WWW Image Optimizer. Click the “Install Now” button to install it. After it has finished installing, click “Activate”.
Step 3: Configure the Plugin
From your WordPress dashboard, hover your mouse over “Settings” on the left-hand menu, then click “EWWW Image Optimizer”.
You’ll now need to choose to either use the plugin’s free offering, or pay a few dollars to get access to premium options which can offer better compression (smaller file sizes with higher image quality). If you’re thinking of going premium, the cost to optimise 3000 images is only $9 USD, and this may be all you ever need. We would strongly recommend the premium option, as it will allow you to backup your original images which makes restoring them very quick and easy should anything go wrong during the optimisation process.
We’ve listed out below the steps for both the premium and free options, depending what you choose.
Premium EWWW Users only should follow the steps below:
First, click on the “Purchase an API key” link to be taken to EWWW’s website where you can purchase your credits. Once you have your API key, we’d recommend the settings below (if we don’t mention a setting, that means you should leave it as is):
On the Basic Settings tab:
- Cloud optimization API Key: Enter the API Key you purchased here.
- JPG Optimization Level: Maximum Lossy *
- PNG Optimization Level: Maximum Lossy *
- Backup Originals: Ticked
* You can always try out this setting and revert back if you think the image quality has reduced too much. The “Backup Originals” option at the bottom allows you to restore your un-optimised images for 30 days, so that you can re-optimise them at a different level if you wish.
Both Free and Premium EWWW Users should follow the steps below:
On the Resize Settings tab:
- Resize Media Images Max Width: 1920
- Resize Media Images Max Height: 1920
- Resize Other Images Max Width: 1920
- Resize Other Images Max Height: 1920
- Resize Existing Images: Ticked
There shouldn’t be too many reasons to have images larger than 1920 pixels. But if you know of/have a specific reason for doing so, you can choose your own values there instead.
Next, open up your cPanel, then find and click on the “File Manager” icon. Navigate to your WordPress files (usually done by clicking on the “pubic_html” folder). Find your wp-config.php file and click “Edit”. If an Edit popup box appears, just click “Edit” again down the bottom-right of the popup. At the top of this file, usually on line 1, you will see the following text: <?php
You’ll want to make a new, empty line just below this on line 2, and paste in the following text:
define( ‘EWWW_IMAGE_OPTIMIZER_SKIP_SIZE’, 600000 ); // Tells EWWW plugin to skip optimisation for images under 600kb
Then, hit “Save Change” in the top right and close the file. The above line basically tells EWWW not to optimise images under 600kb in file size. Anything less than 600kb is likely to have already been optimised in some way, so probably won’t need to be optimised again. You can play around with this value if you want to skip images at a different file size cut-off point.
Step 4: Run The Bulk Optimiser
With your EWWW Image Optimizer plugin now installed and configured, you’re ready to optimise your existing images. Head back to your WordPress dashboard and hover your mouse over “Media” in the left-hand menu, then click on “Bulk Optimize”.
In the “Choose how long to pause between images” box, type in: 3
Then, hit the “Scan for unoptimised images” button. Your website’s images will now be analysed. Once this process is complete, you will be shown how many of your images have room for improvement from optimisation. You can then click the “Start optimizing” button to set the process in motion. Depending on how many images you have, this process could take a little while.
Once complete, you’re done! Any images you upload to your site in future will also be automatically optimised with the settings you implemented above, so you’ll never have to worry about images slowing down your site ever again.
Stayed tuned for our next tip to have your website loading like lightning!
Tip #2 of this series is available here: How To Make Your WordPress Website Load Faster (Tip #2: Database, Comment and Revision Management)